


오렌지 보드를 사용하여 온습도 센서값 LCD에 출력하기

아두이노의 보급은 오픈소스 하드웨어의 확산을 불러일으켰고 메이커 문화의 확산에도 큰 기여를 했다. 최근에는 인텔, 마이크로소프트 등 대형 기업들도 이런 오픈소스 하드웨어시장에 뛰어들기 시작했다. 그 만큼 오픈소스 하드웨어 시장의 잠재력이 커졌다는 얘기이다.
1) 온습도 센서란 무엇인가?
온도는 원자 또는 분자가 가지고 있는 운동에너지의 크기를 말하며, 압력, 저항 등의 물리량으로 변환하여 나타낸다. 온도를 측정하는 방법은 물리량을 측정하는 방법이나 사용하는 재질에 따라 다르다. 이 예제에서 사용된 DHT11 센서는 서미스터(Thermistor: thermally sensitive resistor)라 하는 반도체의 저항이 온도에 따라 변하는 특성을 이용한 온도센서를 사용한다.
일반적으로 금속산화물 반도체를 사용하며, 이는 금속에 비해 비교적 큰 저항온도계수를 갖는다. 서미스터의 저항온도계수(TCR: Temperature Coefficient of Resistance)는 일정하지 않고 온도에 따라 달라지는 특성을 보인다.
온도가 증가함에 따라 저항이 증가 하는 타입을 정온도계수(PTC:positive temperature coefficient)형이라 하며, 온도가 증가함에 따라 저항은 감소하는 타입을 부온도계수(NTC:negative temperature coefficient)형이라 한다. DHT11은 NTC형이 사용되고 있다.
습도란 공기중의 수증기량을 말하며, 습도를 측정하는 방법도 측정하는 방법이나 사용하는 재질에 따라 많은 종류가 있다. DHT11센서에는 습도에 따라 저항이 변하는 정전용량 습도센서를 사용한다.
DHT11센서로 측정가능한 온습도 범위 및 오차는 아래와 같다.

참고로 습도의 단위 RH는 Relative Humidity로 상대 습도를 말한다. 즉 대기 중에 포함되어있는 수증기량과 측정 당시의 온도에서 포함할 수 있는 최대의 수증기량과의 비를 백분율로 표시한 것이다.
온도의 단위 섭씨(℃)는 얼음의 녹는점 0℃도와 물이 끓는점 100℃로 하여 100등분한 단위이며, 화씨(℉)는 얼음이 녹는점을 32℉, 물이 끓는점을 212℉로 하여 그 사이를 등분한 단위다.
2) DHT11 온습도 센서 사용방법
DHT11 센서를 쉽게 사용하기 위해서는 사용방법을 미리 구현해놓은 라이브러리를 다운로드 받아 사용해야 한다.
라이브러리를 받는 방법은 웹에서 직접 받아서 설치하는 방법과 아두이노IDE 안에 있는 라이브러리 관리 탭을 통해 설치하는 방법이 있다. 방법에 관한 선택은 사용자 마음이며 예전에는 라이브러리를 직접 받아서 설치해야 했으나 IDE가 업데이트됨에 따라 이제는 라이브러리 매니저를 통해서 설치하는 것이 좀 더 편하다.
직접 웹에서 받아서 설치하기
DHT11 라이브러리 다운로드 링크 - http://kocoafab.cc/data/oss/libraries/DHT11.zip
받은 라이브러리는 압축을 풀어 원하는 이름으로 폴더 이름을 변경하고, 아두이노 IDE가 설치된 폴더에 있는 libraries 폴더 안에 넣어주면 된다. 그리고 IDE를 재실행하면 DHT11이 추가 되있는 것을 볼 수 있다.

아두이노IDE에서 설치하기
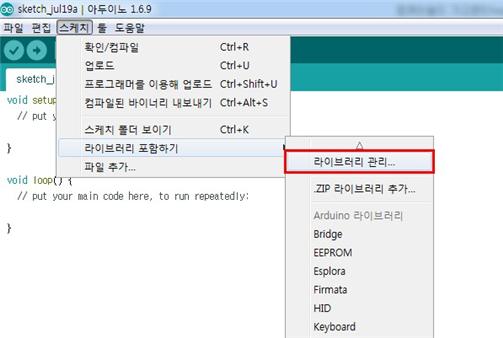
스케치 프로그램에서 스케치 – 라이브러리 포함하기 – 라이브러리 관리 탭을 클릭한다.
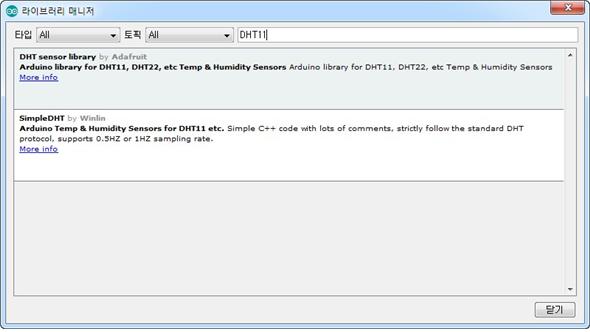
라이브러리 매니저 창이 열렸으면 DHT11을 검색한다.
검색하면 아래와 같이 몇 가지의 라이브러리가 나오는데 그 중에서 사용하고자 하는 라이브러리를 클릭 후, 인스톨하면 설치가 끝난다.
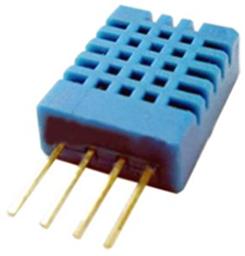
DHT11 센서는 4개의 핀으로 구성이 되어 있으나, 왼쪽부터 1,2,4번째 핀만을 사용한다. 1번 핀은 5V 전원, 2번 핀은 데이터 입출력, 4번 핀은 GND에 연결한다.
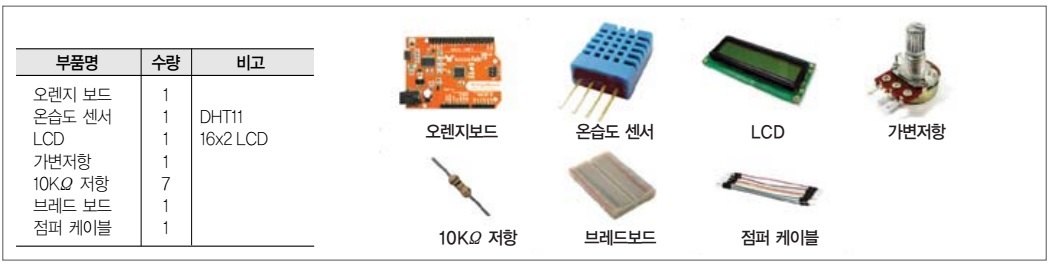
필요한 부품 목록
오렌지보드로 온습도 센서값을 LCD에 출력해보기 위한 준비물은 아래와 같다.
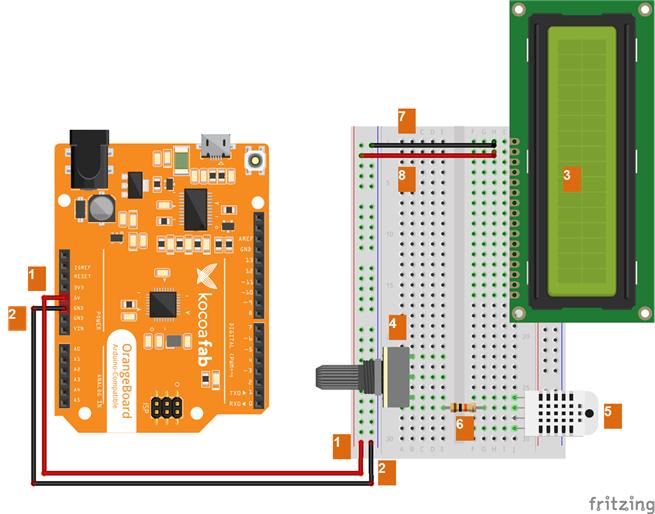
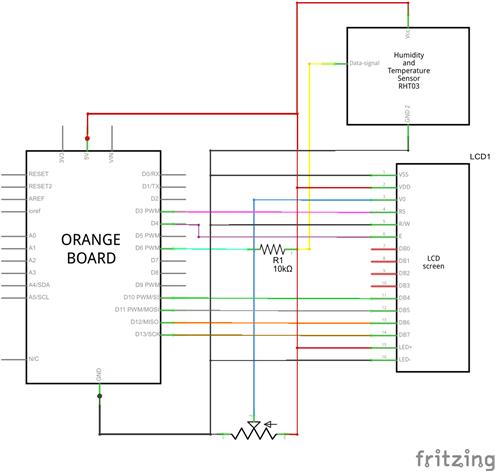
하드웨어 연결하기
1. 오렌지보드의 5V핀을 브레드보드의 +버스에 연결한다.
2. 오렌지보드의 GND핀을 브레드보드의 -버스에 연결한다.
3. LCD를 그럼과 같이 세로로 꽂는다.
4. 가변저항을 그림과 같이 세로로 꽂는다.
5. DHT11 센서를 그림과 같이 오렌지보드를 향하도록 세로로 꽂는다.
6. DHT11 센서의 2번째 data핀에 10KΩ 저항(풀업저항)을 연결한다.
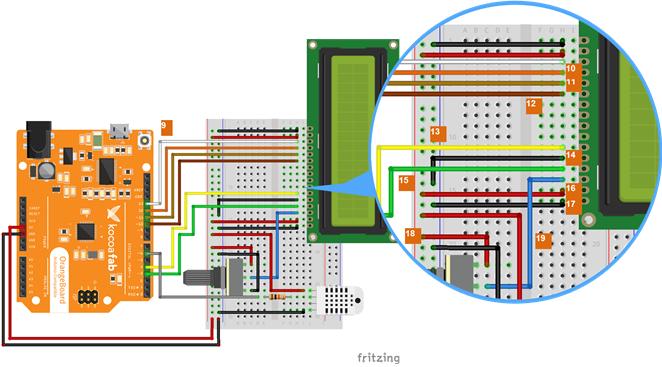
7. LCD의 16번핀을 -버스에 연결한다.
8. LCD의 15번핀을 +버스에 연결한다.
9. LCD의 14번핀을 오렌지보드 13번핀에 연결한다.
10. LCD의 13번핀을 오렌지보드 12번핀에 연결한다.
11. LCD의 12번핀을 오렌지보드 11번핀에 연결한다.
12. LCD의 11번핀을 오렌지보드 10번핀에 연결한다.
13. LCD의 6번핀을 오렌지보드 4번핀에 연결한다.
14. LCD의 5번핀을 -버스에 연결한다.
15. LCD의 4번핀을 오렌지보드 3번핀에 연결한다.
16. LCD의 2번핀을 +버스에 연결한다.
17. LCD의 1번핀을 –버스에 연결한다.
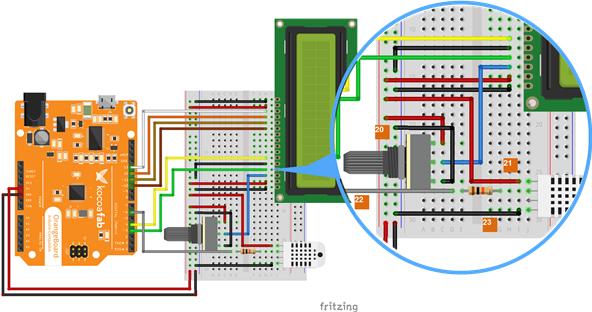
18. 가변저항의 상단 단자를 +버스에 연결한다.
19. 가변저항의 가운데 단자를 LCD의 3번핀에 연결한다.
20. 가변저항의 하단 단자를 -버스에 연결한다.
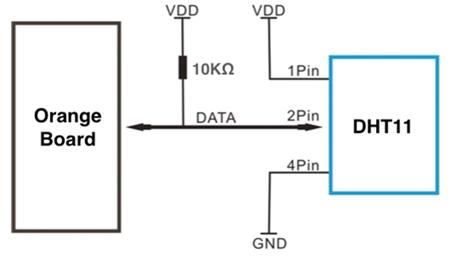
21. DHT11 센서의 1번 전원핀을 +버스에 연결한다.
22. 10KΩ 저항이 연결된 DHT11센서의 2번 데이터핀을 오렌지보드 6번핀에 연결한다.
23. DHT11 센서의 4번 GND 핀을 –버스에 연결한다.
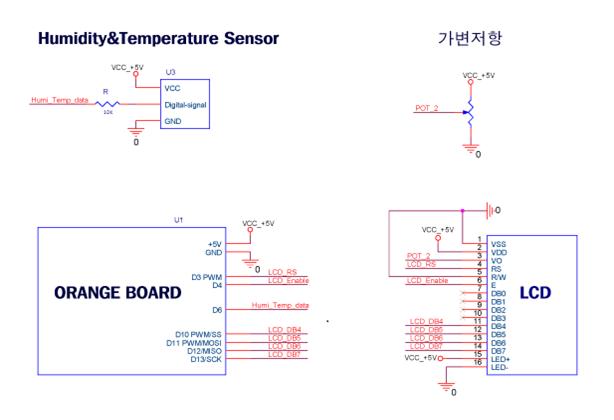
전자 회로도
소스코드
| /* 제목 : 온습도 센서로 실내 온도와 습도 학인하기 내용 : DHT11 온습도 센서를 사용하여 실내 온도와 습도를 측정하고 LCD 에 표시해봅니다 */ // LCD를 쉽게 제어하기 위한 라이브러리를 추가합니다. #include <LiquidCrystal.h> // DHT11 센서를 쉽게 제어하기 위한 라이브러리를 추가합니다. #include <DHT11.h> // LCD 객체를 생성하고 오렌지보드의 3, 4, 10, 11, 12, 13번핀을 사용하도록 설정합니다. LiquidCrystal lcd(3,4,10,11,12,13); // DHT11객체를 생성하고 오렌지보드의 6번핀을 데이터 통신으로 사용하도록 설정합니다. DHT11 dht11(6); // 실행시 가장 먼저 호출되는 함수이며, 최초 1회만 실행됩니다. // 변수를 선언하거나 초기화를 위한 코드를 포함합니다. void setup() { // 조도센서의 동작 상태를 확인하기 위하여 시리얼 통신을 설정합니다. (전송속도 9600bps) // 메뉴 Tool -> Serial Monitor 클릭 Serial.begin(9600); // 16개의 셀과 2줄을 사용하도록 설정합니다. lcd.begin(16,2); // LCD를 초기화 합니다. lcd.clear(); }// setup() 함수가 호출된 이후, loop() 함수가 호출되며, // 블록 안의 코드를 무한히 반복 실행됩니다. void loop() { int err; float humi; float tem; // dht11.read() 함수는 DHT11 센서로부터 측정된 값을 읽으며, // 성공시에는 0을 반환하고, 실패시 에러코드를 반환합니다. if ((err = dht11.read(humi, tem)) == 0) { // float 데이터 타입의 습도 값을 문자 배열로 변환하고 소숫점 1자리만 유지하도록 합니다. char humiCharValue[10]; dtostrf(humi, 4, 1, humiCharValue); // 습도 정보를 표시하기 위한 문자열을 생성합니다. String humiDisplayStr = "Humidity: "; humiDisplayStr += (String)humiCharValue; humiDisplayStr += " %"; // 0번째 줄 0번째 셀부터 입력하게 합니다. lcd.setCursor(0,0); // 현재 습도를 LCD에 출력합니다. lcd.print(humiDisplayStr); // float 데이터 타입의 온도 값을 문자 배열로 변환하고 소숫점 1자리만 유지하도록 합니다. char temCharValue[10]; dtostrf(tem, 4, 1, temCharValue); // 온도 정보를 표시하기 위한 문자열을 생성합니다. String temDisplayStr = "Temper : "; temDisplayStr += (String)temCharValue; temDisplayStr += "'C"; // 1번째 줄 0번째 셀부터 입력하게 합니다. lcd.setCursor(0,1); // 현재 온도를 LCD에 출력합니다. lcd.print(temDisplayStr); } // 에러 발생시 에러번호와 에러를 시리얼 모니터에 출력합니다. else { Serial.println(); Serial.print("Error No :"); Serial.print(err); Serial.println(); } // DHT11_RETRY_DELAY는 DHT11.h에 정의되어있으며, 1초(1000)입니다. // 따라서 1초동안 대기합니다. delay(DHT11_RETRY_DELAY); } |
위 코드는 회로도를 보면 알겠지만 LCD와 온습도 센서 두 가지를 같이 사용하는 코드를 담고 있다. LCD의 경우에는 튜토리얼(4)에서 간단히 사용법에 대해 작성했기 때문에 별도의 설명은 생략한다. DHT11은 별도의 라이브러리를 사용하지만 사용법이 매우 간단하기 때문에 쉽게 따라할 수 있을 것이다.
라이브러리를 사용하는 센서를 사용할 때는 언제나 그렇듯이 먼저 객체를 위쪽에 먼저 선언한다. 객체 선언 괄호 안쪽에는 간단하게 DHT11과 연결된 데이터 입출력핀을 넣으면 된다.
| // DHT11객체를 생성하고 오렌지보드의 6번핀을 데이터 통신으로 사용하도록 설정합니다. DHT11 dht11(6); |
그 다음 DHT11에서 센서값을 읽어와야 하는데 아래의 구문을 통해서 온도와 습도값을 읽어온다.
주석과 같이 성공시에는 0을 반환하고, 값을 읽어오는데 실패할 경우에는 에러코드를 반환한다.
| // dht11.read() 함수는 DHT11 센서로부터 측정된 값을 읽으며, // 성공시에는 0을 반환하고, 실패시 에러코드를 반환합니다. dht11.read(humi, tem) |
위에서 성공적으로 읽어왔다면 humi, tem이라는 변수에 각각 습도값, 온도값이 저장되는데 dtostrf함수를 사용하여 각각 쉽게 알아볼 수 있는 String타입의 값으로 변환한다.
dtostrf(String으로 변환할 변수, 자릿수, 소수점아래 자릿수, 변환된 값이 저장된 변수)
| dtostrf(humi, 4, 1, humiCharValue); dtostrf(tem, 4, 1, temCharValue); |
마치며
온습도 센서는 온도와 습도 두 가지를 한 번에 측정할 수 있는 센서이기 때문에 실생활에서 다양하게 쓰일 수 있다. 집안의 온도와 습도를 측정해서 알려줄 수도 있으며, 현재 온도와 습도에 따라 자동으로 기구를 제어하는 홈IoT시스템을 구현해 볼 수도 있다. tmp36이나 lm35보다는 온도 측정이 정확한 편이며 그렇기 때문에 가격도 두 센서보다는 비싼편이다.
아두이노를 사용한다면 자주 볼 수 있는 센서이기 때문에 사용법을 익혀놓는다면 실생활에서 사용할 수 있는 프로젝트를 제작할 때 유용하게 사용할 수 있을 것이다.
 코코아팹은 한국 메이커 문화를 만들어가는 온라인 메이커포털이다. 오픈소스 하드웨어 오렌지보드의 생산과 활용법 공개 등 많은 활동을 진행하고 있다. |
[Tutorial]
Easy-to-follow Orange Board Tutorial (8)
Printing Temperature & Humidity Sensor Values to LCD Using Orange Board
The distribution of Arduino boards triggered the spread of open-source hardware and significantly contributed to the spread of Maker Culture as well. Recently, conglomerates such as Intel and Microsoft have also started to enter this open-source hardware market. This reflects that the potential of open-source hardware market has grown likewise.
1) What Are Temperature-humidity Sensors?
Temperature refers to the size of kinetic energy that atoms or molecules possess, and is converted and displayed as a physical quantity such as pressure or resistance. Temperature can be measured by measuring the aforementioned physical quantity, and this differs depending on the material used for measurement. In this exercise, we will be using a DHT11 sensor, a temperature sensor known as a thermistor (thermally sensitive resistor). As its semiconductor’s resistance changes when the temperature does, this can be used to read the temperature.
In most cases, metal oxide semiconductors are used, which results in the thermistor having a comparatively larger TCR (Temperature Coefficient of Resistance) than metal semiconductors. The thermistor’s TCR is not fixed, and has the property of changing depending on the temperature.
Thermistors can be found in two types - the PTC (positive temperature coefficient) type and the NTC (negative temperature coefficient) type. In the PTC type, the resistance increases as the temperature rises, while in the NTC type the resistance decreases instead. The DHT11 sensor employs an NTC thermistor.
Humidity refers to the amount of water vapor in the air, and there are many different ways and materials used to measure it. The DHT11 sensor employs a capacitive humidity sensor that changes its resistance based on the humidity.
The range and margin of error for the temperature and humidity measured by the DHT11 sensor are as follows.
For your reference, RH is one of the units used measure humidity, and stands for relative humidity. In other words, it displays the ratio of water vapor in the atmosphere to the maximum water vapor that can be contained in the temperature at the time of measure as a percentage.
Two possible units of measurement for temperature are Celsius(℃) and Fahrenheit(℉). Whereas Celsius uses 0℃ as the freezing point and 100℃ as the boiling point, dividing the unit into 100 parts, Fahrenheit sets 32℉ as the freezing point and 212℉ as the boiling point and divides the degrees in between.
2) Learning to Use the DHT11 Temperature & Humidity Sensor
In order to use the DHT11 sensor easily, we must first download a library with a pre-rendered how-to-use guide.
We can install the library by downloading it directly from the web or through the Manage Libraries tab inside the Arduino IDE. In the past, everyone had to directly download the library to install it, but the updated IDE now allows users to install it through the Library Manager, which makes the process more convenient. Both methods are valid and a matter of personal preference.
Installing via Direct Download from Web.
DHT11 Library Download Link - http://kocoafab.cc/data/oss/libraries/DHT11.zip
Extract the downloaded library and rename the folder as you wish, and then put the folder in the libraries folder inside the folder that the Arduino IDE is installed in. Simply restart the IDE to find the newly added DHT11.
Installing via Arduino IDE
Click Sketch > Include Library > Manage Libraries tab on the sketch program.
Once the Library Manager window is open, search for DHT11. We should see several libraries appear like in the picture below. Simply click the library that we wish to use and install it.
The DHT11 sensor is made up of 4 pins. Among them, we will only be using the 1st, 2nd, and 4th pins from the left. The 1st pin is the 5V power supply, the 2nd pin is for data input and output, and the 4th pin connects to the GND.
List of Items Required
The following items are required to display the temperature & humidity sensor values on an LCD using the Orange Board.
Connecting to Hardware
1. Connect the 5V pin of the Orange Board to the +bus of the breadboard.
2. Connect the GND pin of the Orange Board to the -bus of the breadboard.
3. Mount the LCD lengthwise as shown in the picture below.
4. Mount the variable resistor lengthwise as shown in the picture below.
5. Mount the DHT11 sensor lengthwise so that it faces the Orange Board as shown in the picture below.
6. Connect the 10KΩ resistor (pull-up resistor) to the 2nd data pin on the DHT11 sensor.
7. Connect the 16th pin of the LCD to the -bus.
8. Connect the 15th pin of the LCD to the +bus.
9. Connect the 14th pin of the LCD to the 13th pin of the Orange Board.
10. Connect the 13th pin of the LCD to the 12th pin of the Orange Board.
11. Connect the 12th pin of the LCD to the 11th pin of the Orange Board.
12. Connect the 11th pin of the LCD to the 10th pin of the Orange Board.
13. Connect the 6th pin of the LCD to the 4th pin of the Orange Board.
14. Connect the 5th pin of the LCD to the -bus.
15. Connect the 4th pin of the LCD to the 3rd pin of the Orange Board.
16. Connect the 2nd pin of the LCD to the +bus.
17. Connect the 1st pin of the LCD to the -bus.
18. Connect the upper terminal of the variable resistor to the +bus.
19. Connect the center terminal of the variable resistor to the 3rd pin of the LCD.
20. Connect the lower terminal of the variable resistor to the -bus.
21. Connect the 1st power pin of the DHT11 sensor to the +bus.
22. Connect the 2nd data pin of the DHT11 sensor that is connected to the 10KΩ resistor to the 6th pin of the Orange Board.
23. Connect the 4th GND pin of the DHT11 sensor to the -bus.
Electronics Circuit Diagram
Source Code
| /* Title: Confirming Indoor Temperature and Humidity with the Temperature & Humidity Sensor Content: Use the DHT11 temperature & humidity sensor to measure indoor temperature and humidity and display the measurement on an LCD. */ // Add a library that will help control the LCD easily. #include <LiquidCrystal.h> // Add a library that will help control the DHT11 sensor easily. #include <DHT11.h> // Create an LCD object and set it to use the 3rd, 4th, 10th, 11th, 12th, and 13th pins of the Orange Board. LiquidCrystal lcd(3,4,10,11,12,13); // Create a DHT11 object and set it to use the 6th pin of the Orange Board for data communication. DHT11 dht11(6); // This is the first function to be called upon execution, and will only be executed once on its first execution. // Include a code to declare or initialize a variable. void setup() { // Set serial communication in order to confirm the movement state of the illumination sensor. (Transfer speed 9600bps) // Click Tool -> Serial Monitor on the menu. Serial.begin(9600); // Set it so that 16 cells and 2 lines are used. lcd.begin(16,2); // Clear the LCD. lcd.clear(); }// After the setup() function is called, the loop() function will be called, // and the code within the block will be executed in an infinite loop. void loop() { int err; float humi; float tem; // The dht11.read() function will read the measured data from the DHT11 sensor, // and return a 0 on a success or an error code on a failure. if ((err = dht11.read(humi, tem)) == 0) { // Change the humidity values of the float data type into character array and make it so that it only maintains 1 decimal place. char humiCharValue[10]; dtostrf(humi, 4, 1, humiCharValue); // Create a string to display the humidity information. String humiDisplayStr = “Humidity: ”; humiDisplayStr += (String)humiCharValue; humiDisplayStr += “ %”; // Start entering from the 0th cell of the 0th line. lcd.setCursor(0,0); // Display the current humidity on the LCD. lcd.print(humiDisplayStr); // Change the humidity values of the float data type into character array and make it so that it only maintains 1 decimal place. char temCharValue[10]; dtostrf(tem, 4, 1, temCharValue); // Create a string to display the temperature information. String temDisplayStr = “Temper : ”; temDisplayStr += (String)temCharValue; temDisplayStr += “℃”; // Start entering from the 0th cell of the 1st line. lcd.setCursor(0,1); // Display the current temperature on the LCD. lcd.print(temDisplayStr); } // If an error has occurred, display the error number and error on the serial monitor. else { Serial.println(); Serial.print(“Error No :”); Serial.print(err); Serial.println(); } // DHT11_RETRY_DELAY is defined in the DHT11.h, and is 1 second (1000). // Therefore, it will stand by for 1 second. delay(DHT11_RETRY_DELAY); } |
As we can see from the electronics circuit diagram, the above code contains a code that uses the LCD and the temperature & humidity sensor together. As we have already gone over the basics of the LCD in the Tutorial (4), we will skip over the particulars of its use. The DHT11 uses a separate library. However, as it is incredibly simple to use, it should prove easy enough to follow the instructions.
When using a sensor that makes use of a library, always declare the object at the top before anything else. Simply insert the data input and output pin connected to the DHT11 within the parentheses of the object declaration.
| // Create a DHT11 object and set it so that it uses the 6th pin of the Orange Board for data communication. DHT11 dht11(6); |
Next, we have to read sensor values from DHT11. We read temperature and humidity values from the following text. As in the comment, return a 0 on a success, and an error code on a failure.
| // The dht11.read() function will read the measured data from the DHT11 sensor, // and return a 0 on a success or an error code on a failure. dht11.read(humi, tem) |
If the above was read successfully, the humidity values and temperature values will respectively be saved in variables called humi and tem, and the dtostrf function will be used to change them each into easily readable String type values.
dtostrf (variables, digits, digits behind decimal places, and variables where changed values have been saved that are to be changed into a String)
| dtostrf(humi, 4, 1, humiCharValue); dtostrf(tem, 4, 1, temCharValue); |
Conclusion
As temperature & humidity sensors allow you to measure both temperature and humidity at once, they have many uses in day-to-day life. Not only can they measure and tell you the temperature and humidity of your home, it may even be possible to create a home IoT system that automatically controls your appliances depending on the current temperature and humidity. As the DTH11 sensor offers a more accurate temperature measurement experience than TMP36 or LM35 sensors, it should come as no surprise that it costs more than the aforementioned models.
Those using Arduino will find themselves encountering this sensor quite often, so learning how to use it is sure to come in handy when taking on projects in real life.